Saturday, February 7, 2015

MonoMac #3: Creating a prompt dialog

One of my most important pieces of advice if you're creating a Xamarin codebase is to pay especially good attention to separation of concerns. In a best case, you'll want to reuse everything but the UI when you go from app to app and platform to platform.

I do this by first creating a project with all of my "business logic", and I perform testing via a minimal command line application that'll behave the same regardess of the platform you're running on. This makes it easy for me to develop an app for any platform on any platform, which is great. And by "any", I do mean "any" -- you can run Mono with MonoDevelop on Linux and develop this headless + command line app. That's kind of neat (and also forces you to separate concerns).

Console utility functions

I have a utility class that has some static methods in it that help me to this.

Quick hint: We're going to use Console.WriteLine() in this example, but when you're playing with the command line, it's often more useful to do something like this:

public static void WriteAtLine(int intLine, string strToWrite)
{
   ClearLineSetCursor(intLine);
   Console.Write(strToWrite);
}
public static void ClearLineSetCursor(int intRow)
{
  Console.SetCursorPosition(0, intRow);
  Console.Write(new String(' ', Console.BufferWidth));
  Console.SetCursorPosition(0, intRow);
}
The real "trick" is the SetCursorPosition line, where you set your cursor and clear out a line like you would waaaay back in the day, when you were writing for a dumb terminal. It's surprising how much thought goes into making a good command line client, even if you're the only one using it.

Here's one of my most active ones, as it's what prompts for and grabs data from the user:

public static string PromptAndResponse(string strPrompt, 
    bool isPassword = false)
{
    string strReturn = string.Empty;
    Console.Write(strPrompt);

    if (isPassword)
    {
        ConsoleKeyInfo conkeyInfo;
        do
        {
            conkeyInfo = Console.ReadKey(true);
            strReturn += conkeyInfo.KeyChar;
            Console.Write("X");
        } while (ConsoleKey.Enter != conkeyInfo.Key);
    }
    else
    {
        strReturn = Console.ReadLine();
    }

    return strReturn.TrimEnd();
}

Porting your console app to a Mac GUI

So this is my first port to Mac. With my simpler mobile apps, I just started from scratch, and hooked up my business logic without any real porting. But on one of my larger projects -- an email client -- I figured it was worth giving a true porting of my command line client a shot.

But what do you do to stub out these utility functions while you're mid port? You certainly don't to take in input from the command line in a serious Frankenstein's App interface, do you?

This isn't much better, but after looking through this answer on StackOverflow, I made a javascript prompt style utility function to replace PromptAndRepsonse on the command line.

Now this said, I do completely agree with this comment on that StackOverflow question, which says, "There isn't a predefined method for that because that's bad UI. That should just be a field." This is a simple stand-in while you're really coding your UI, okay?! Promise?!?

Here we go. I'm going to just slap it into MainWindow.cs as a static method to make things easy to run, but you'd want to factor it somewhere else. This is nothing but a port of the code from the above StackOverflow answer:

public static string PromptAndResponse(string msg)
{
    string strReturn = string.Empty;

    NSAlert alert = new NSAlert ();
    alert.MessageText = msg;
    alert.AddButton ("Ok");
    alert.AddButton ("Cancel");

    NSTextField input = new NSTextField (new Rectangle (0, 0, 200, 24));
    input.StringValue = string.Empty;
    alert.AccessoryView = input;

    int intSelectedButton = alert.RunModal ();
    if (intSelectedButton.Equals((int)NSAlertButtonReturn.First))
    {
        strReturn = input.StringValue;
    }

    return strReturn;
}

Only one thing really bugged me there. Check out the description of the NSAlertButtonReturn enum from Apple's docs.

The enum is wacky. It goes to three (1000, 1001, 1002), then you're on your own. Cocoa counting cultural level: One, two, three, many. Why use an enum at all? Anyhow, let's keep up with the sample code and use it.

I guess I also feel there's got to be an cleaner way to get to 1000 from ~First than a cast. When I have it paused, I can use .Value, but that doesn't exist (?) at compile time.

Example usage

To use this code in an example, simply add it somewhere in your MainWindow.cs file, and then insert this AwakeFromNib function to that same file:

public override void AwakeFromNib ()
{
    int intButtonHeight = 25;
    int intButtonWidth = 120;

    int intFullHeight = (int)this.ContentView.Frame.Size.Height;

    NSButton cmdGo =  new NSButton(new Rectangle (
        20, intFullHeight - 50,
        intButtonWidth, intButtonHeight
    ));
    cmdGo.Title = "Send/Receive";
    cmdGo.BezelStyle = MonoMac.AppKit.NSBezelStyle.Rounded;
    cmdGo.Activated += (object sender, EventArgs e) => {
        string strReply = MainWindow.PromptAndResponse(
            "Enter some text, please."
        );
        Console.WriteLine(strReply);
    };
    this.ContentView.AddSubview (cmdGo);
}

This is the most aggravating part of Apple's "(0,0) is at the bottom left corner" coordinate system we mentioned last time, and will mention again in the next step. If I want to place a button at the top left, I have to start calculating against the NSWindow's height. And, extra annoyingly, I don't know how to get the Window's height with the titlebar yet (I'm just grabbing the ContentView's height here). /sigh So I'm pretending it's about 30 until I stumble over a better source for the height.

And run it with Command-Return. Voila. Pretty exciting.

Now to really mess with yourself, resize the window. Make it smaller. Now quit. Now reopen. Huh? We'll start dealing with adding UI widgets more deliberately next time. But for now, we have an easy stand-in for our command line apps while we're porting each function over.

Friday, January 30, 2015

MonoMac #2: Xibless NSMenus and NSMenuItems

I've been working on a larger post where we work on window sizing and adding our edit and web preview views, but first a quick flyby: Menus.

Addings NSMenus is pretty easy.

  • Open MainWindow.cs.
  • Insert a new override method, AwakeFromNib, where we'll set up widgets.
  • Build your menu hierarchy, and attach to the NSApplication.SharedApplication.MainMenu.

Wire-up existing menus

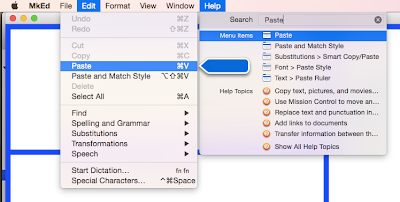
First, let's take some of the many menus that come "for free", apparently, when you set up a new MonoMac project. Out of the box, you've got the app menu, File, Edit, Format, View, Window, and Help. Some of them even do something -- for instance, if you select Help, you can type in the name of another menu item and have it highlighted in your UI.

So add AwakeFromNib to your MainWindow.cs file:

public override void AwakeFromNib ()
{
}

We'll create your UI inside of that new method, starting with wiring up existing menus.

Try this code as an experiment; it will show you the names of all the menus that come "stock", without any work on your part. (Honestly, it's kind of annoying to have to inherit all of this menu cruft. I was surprsied it was there.)

public override void AwakeFromNib ()
{
    foreach (NSMenuItem itemOuter in appMainMenu.ItemArray())
    {
        NSMenu menuTemp = itemOuter.Submenu;
        foreach (NSMenuItem itemInner in menuTemp.ItemArray()) {
            Console.WriteLine (itemOuter.Title + " :: " + itemInner.Title);
        }
    }
}

Go ahead and run your app. Your result should be something like this:

[YourAppName]MenuItems :: About [YourAppName]MenuItems
[YourAppName]MenuItems :: 
[YourAppName]MenuItems :: Preferences…
[YourAppName]MenuItems :: 
[YourAppName]MenuItems :: Services
[YourAppName]MenuItems :: 
[YourAppName]MenuItems :: Hide [YourAppName]MenuItems
[YourAppName]MenuItems :: Hide Others
[YourAppName]MenuItems :: Show All
[YourAppName]MenuItems :: 
[YourAppName]MenuItems :: Quit [YourAppName]MenuItems
File :: New
File :: Open…
File :: Open Recent
...[Edit, Format, View, Window removed]...
Help :: [YourAppName]MenuItems Help

So this time, instead of iterating through all of the menus and menu items, let's grab the File and Open… menu items to wire up Open….

Note: The word Open is followed by a non-ASCII ellipses: . That's a single character. We know that because that's what was reported in our menu iteration.

It's also worth saying I really dislike this code we're creating for production. If we were on a French machine, would we have the same word? Would Open… still work even if the text is different? Ultimately, I'd probably want to remove as many of the stock menus as possible and start building all the menus from scratch so that I can control. We'll see after we play around.

Let's put all this in a try...catch just in case the by name lookup goes insane. For now, we won't use a centralized error handler, but at some point you will want to log errors to a file and display them intelligently.

try
{
    // Grab the submenu hanging down off of the File menu.
    NSMenu mnuExisting = appMainMenu.ItemWithTitle ("File").Submenu;

    // Now search it for the Open… menu item.
    NSMenuItem mniOpen = mnuExisting.ItemWithTitle("Open…");

    // And hook up an event handler.
    mniOpen.Activated += (object sender, EventArgs e) => {
        Console.WriteLine("Open");
    };
}
catch (Exception e)
{
    Console.WriteLine ("Error: " + e.ToString ());
}

Now if you select the File >>> Open menu, "Open" will be written to the console, representing, well, the ability to do anything you want in your app. Yay!

Create a new menu

Next, let's create a new NSMenu of our own! For now, we're just going to add another menu to the end of this existing list.

To "anchor" your menu, you need to add it to the existing, top-level application menu that runs on the top of the screen. As we saw above, that bar across the top of the app is an NSMenu, as is the scaffolding for each of the drop-down menus beneath it. Somewhat unintuitively, you have to add an NSMenuItem to an NSMenu even if you want that spot to be taken by a sub-NSMenu. So we need to create one NSMenuItem to put on the main menu, but then we attach an NSMenu to that NSMenuItem's Submenu. And the NSMenu's title will override the title we set up for the NSMenuItem.

This will make more sense in code, perhaps. ;^)

public override void AwakeFromNib ()
{
    // Note that this title won't be seen, strangely.
    NSMenuItem mniFizz = new NSMenuItem("Fizz");

    // *This* is the title you'll see at the top level menu.
    NSMenu mnuBuzz = new NSMenu("Buzz");           

    NSMenuItem mniPreview = new NSMenuItem("Preview Markdown");
    NSMenuItem mniExport = new NSMenuItem ("Export to HTML");

    mnuBuzz.AddItem(mniPreview);
    mnuBuzz.AddItem(mniExport);

    mniFizz.Submenu = mnuBuzz;

    // Now add your item to the existing main menu.
    NSApplication.SharedApplication.MainMenu.AddItem(mniFizz);
}

I think, aside from the item vs. menu title usage, that's all pretty self-explanatory.

The last thing we need to add is an event handler. I'm going to go the simplest route, and add an anonymous handler for now, again inside of AwakeForNib.

    mniPreview.Activated += (object sender, EventArgs e) => {
        Console.WriteLine("Preview Markdown");
    };

Now, when you click on the "Preview Markdown" menu, you'll get that written to the console. Obviously we could do much cooler stuff once we have an actual app behind it.

Add a menu item to an existing menu

The last thing I'm going to do is to add a special Copy button to my Markdown editor. If there's one thing that drives me crazy about the ones I've used on a Mac, it's that I'm always exporting to html, then opening that file in VIm, then cleaning out everything up to and including the <body> tag, and the cleaning up the last few lines and </body></html> etc. I'd rather just be able to hit Command+l and bam, have the html source in my system clipboard.

I think we can make that happen (though I might later add a preference for putting all of the html into the clipboard, understanding not everyone wants a cleaned version every time.

// First grab the Edit menu.
NSMenu mEdit = appMainMenu.ItemWithTitle("Edit").Submenu;

// Now create the new NSMenuItem. Note the `"l"`, which
// will be our keyboard accelerator (when Command is also pressed)
NSMenuItem iCopyAsHtml = new NSMenuItem ("Copy as HTML", "l");
iCopyAsHtml.Enabled = true;

iCopyAsHtml.Activated += (object sender, EventArgs e) => {
    Console.WriteLine("Copy as HTML");
};
mEdit.InsertItem(iCopyAsHtml, 5);

Again, this method of menu insertion and creation is not defensively coded at all. Later, we'll either remove everything and then add our menus, or defensively look for each menu we depend on and handle its existence or lack thereof. If you look over at MooStep, for instance, the first thing that he does is var mainMenu = new NSMenu();, and the last thing is to put that into the app's MainMenu with NSApplication.SharedApplication.MainMenu = mainMenu;

Creating a menu from scratch makes us know for sure that there's no extra menu items that we didn't create and less reason to do the careful stepping around what's already there, and that's A Good Thing. Honestly, I just don't what to lose that Help menu, and I don't know how to create that from scratch yet. ;^)

And voila, we've got functional menus.

Wednesday, January 21, 2015

MonoMac #1: Changing window size editing the xib in MonoMac (updated)

EDIT: I'm afraid I initially did this one all wrong. Before, I edited the xib directly, which is apparently a risky proposition. So let's try again, the safe way. If you read this before, you'll notice one or two changes. ;^)


I believe we'll start with MonoMac. MonoMac itself is a strange beast. Even Xamarin employees on their official forums have a hard time explaining the difference.

Here's the bottom line: MonoMac lets you make apps of nearly limitless size that you can't sign easily or release on the app store. Apps made by MonoMac are also intended to be run by someone who has installed the Mono runtime separately. Xamarin.Mac will crunch out what parts of Mono your app uses, and package that up with your app's code before creating an executable for the App Store (or however else you'd like to distriute it). You have options for doing something similar yourself, like using BockBuild, the package Banshee uses to be a self-sufficient app bundle, but it's going to be more work.

Xamarin.mac also doesn't [yet] let you pay for a Xamarin license on the month-by-month plan. Which stinks. Makes some sense, since I don't believe MonoMac has the size limitation that Xamarin.iOS or .Android have, and you could concievably build your entire app in MonoMac, pay $25, compile and sign, and slap something on the Mac App Store. /wink wink

Resizing your window


But let's get to the code. It's going to be horribly quick today. You've got Xamarin Studio installed. Open it. Select "New Solution" on the left. Under "Unsupported", select "MonoMac Project". Enter an incredibly awesome name, like MyMonoMacUI. Hit okay.

Pow. Just for fun, go ahead and hit Command-Return. Lookit there! A window! That's cookin' with gas. Go ahead and hit Command-Shift-Return or click the stop button at the upper left of Xamarin Studio.

So let's change that window's size. Usually, what we'd do would be to double-click MainWindow.xib, open XCode, and set up our UI there, just like Xamarin's Hello, Mac tell us to. But in my limited exposure to Xamarin, that's not the best route for quick, pixel-perfect designs.

I am going to build our first app with what's called "xibless" code. We still have a xib -- MainWindow.xib -- but we're going to use the Initialize and AwakeFromNib methods in MainWindow.cs to set up our UI in code instead. This lets us, I think, much more efficiently position our widgets pixel-perfectly. It also means we have less to learn; if you can C# your way around the UI, you'll never have to open XCode at all.

So resizing is actually pretty easy. Open up MainWindow.cs in Xamarin Studio, and look for the Initialize method. Insert this line to change the frame's size and position:

this.SetFrame(new RectangleF (10, 11, 800, 800), true);

If you just pasted that in, you'll note that RectangleF is red. I'm going to assume you know how to use using in C# and simply say we're missing the reference to RectangleF's namespace. Easy enough to add. Right click RectangleF in Xamarin Studio, select Resolve to let Xamarin Studio give us a list of possible references, and then select using System.Drawing from our options.

Go ahead and hit command+return and watch the form open up. Wow.

And there you go. A square window. We're using a RectangleF to position the window on the screen. There are two types of rectangles I've run into so far -- the RectangleF and Rectangle. The only difference is that RectangleF expects float values and the Rectangle wants ints. The first value, a 10, is how far we'll position the window on the screen from the left. The second number, the 11, is how far from the top we'll be. Then we have the window's width and height, both 800 for now.

Man, we're rolling now.

One freebee "power user" tip, not that I claim to be one: To open more than one instance of Xamarin Studio, use this line in your Terminal (assuming you've got Xamarin Studio in the default location):

open -n /Applications/Xamarin\ Studio.app/

I know, not a lot yet, but we're starting. Happy hacking!

Saturday, January 17, 2015

SSL, POP3, and Xamarin

I'm going to xpost this from my "main" blog, since it's Xamarin related, and because I looked here to find it first. Whoops.

Somewhat painfully, Xamarin wouldn't connect to a POP3 server when I broke out some out email client code. After some trial and error, this appears to be because I didn't have the write certificates, which was fixed by using...

mozroots --import --ask-remove

That, I believe, imports everything that Mozilla would typically have handy. More here.

Easy enough fix, but how do I do the same for my clients if I push out an app? Sounds like I've got some extra overhead in front of me, and that I've made it much more difficult to handle thanks to my having run mozroots now.